 Do you wanna build a snowman? No? Ok. What about a snowman ornament for your christmas tree?
This is a very easy christmas craft that would be perfect for large groups such as MOPS or other get togethers to make together. It doesn’t take many supplies and it’s pretty hard to mess up. Trust me, I tried.
Do you wanna build a snowman? No? Ok. What about a snowman ornament for your christmas tree?
This is a very easy christmas craft that would be perfect for large groups such as MOPS or other get togethers to make together. It doesn’t take many supplies and it’s pretty hard to mess up. Trust me, I tried.
 The main part of this project is the rough edge wood coaster that will be your base. You can find them on Amazon.com right here or at your local craft stores.
You will also need paintbrushes, a pencil with an eraser, and the paint colors white, black, pink and orange. I just grabbed the first colors I saw in all of my paints and mixed them to make the colors I wanted.
The main part of this project is the rough edge wood coaster that will be your base. You can find them on Amazon.com right here or at your local craft stores.
You will also need paintbrushes, a pencil with an eraser, and the paint colors white, black, pink and orange. I just grabbed the first colors I saw in all of my paints and mixed them to make the colors I wanted.
 Paint a white circle on your wood coaster, leaving a little lip of natural wood. After I painted this I took a paper towel and rubbed any excess paint off so that some of the natural rings in the wood showed lightly through the paint.
 Now take your pink paint (mix red + white) and put a dot of the color on each side of the coaster to make the cheeks. I used my finger to rub in the dot or you can use a paper towel.
 Messy paint palletes are ok.
Dip the eraser end of your pencil into black paint. If you’ve never painted dots with a pencil before, you might want to try it out on paper before you put it on your snowman.
Messy paint palletes are ok.
Dip the eraser end of your pencil into black paint. If you’ve never painted dots with a pencil before, you might want to try it out on paper before you put it on your snowman.
 Make one black dot for each eye.
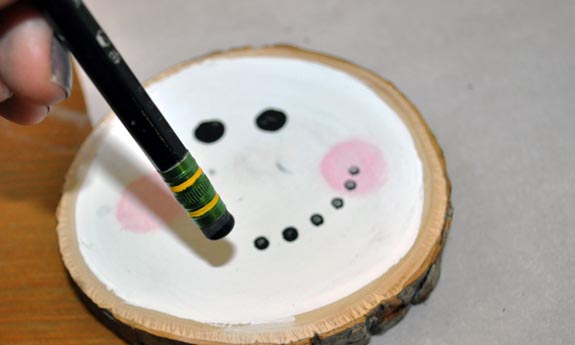 Then use the pencil eraser to make the mouth. Press harder in the middle of the mouth to make a larger circle and decrease pressure on each side of the mouth as you get closer to the cheek to make the smaller dots.
 Now dip the skinny end of your paint brush or the sharp pencil tip in white paint and use it to make white highlights on the eyes and mouth.
Finally you’re going to paint the nose by pressing down a paintbrush full of orange paint in the middle of the face and pulling it out and up towards the cheek.
Then you’ll have the cutest lil’ snowman coaster you’ve ever seen.
Now dip the skinny end of your paint brush or the sharp pencil tip in white paint and use it to make white highlights on the eyes and mouth.
Finally you’re going to paint the nose by pressing down a paintbrush full of orange paint in the middle of the face and pulling it out and up towards the cheek.
Then you’ll have the cutest lil’ snowman coaster you’ve ever seen.
 But what if you don’t want it to stay a coaster? To make it an ornament simple attach an o-ring or a hammer a large wood staple partially into the top of the coaster. Use bakers twine or string to hang the ornament.
I used a large rusty metal staple that I found in the garage because the rusty metal fit the rustic look I was going for. Use upmost care when using rusty metals and be aware that it could be extremely dangerous.
But what if you don’t want it to stay a coaster? To make it an ornament simple attach an o-ring or a hammer a large wood staple partially into the top of the coaster. Use bakers twine or string to hang the ornament.
I used a large rusty metal staple that I found in the garage because the rusty metal fit the rustic look I was going for. Use upmost care when using rusty metals and be aware that it could be extremely dangerous.
 Isn’t he cute?
Does he make you want to build a snowman now? Send me your project pictures if you make this ornament!
Please pin this ornament and share it with your friends!
Isn’t he cute?
Does he make you want to build a snowman now? Send me your project pictures if you make this ornament!
Please pin this ornament and share it with your friends!


I bought a stencil and when I put it on the wood coaster it bleed through a little. How do you transfer a stencil to contact paper or how do I make it look more crisp when painting on the monogram?
If you’re using a stencil there’s two ways to get crisper lines. One is to paint over a light coat of your base color first – not the color you’re going to be putting on the stencil but the color of the base. Stencil a base coat color first and then without moving your stencil at all, then do the stencil colors that you want. The second is to do a thin layer of modpodge over the stencil area first.